Search Results: "bzed"

23 September 2010

Bernd Zeimetz: monitoring scientific atlanta cable modems with munin

Usually I like to monitor as much as possible. but unfortunately my cable provider does not allow to access the cable modem via SNMP, so I had to find a different way to retrieve at least some basic information. After a bit of googling I figured out how to access the web interface of the Scientific Atlanta modems. The model here is a EPC2203 - seems to work for various models, though. These modems do not only provide access to the traffic within the cable network on their internal networking port (ever tried tcpdump on that?), but they also have their own IP (192.168.100.1). To be able to access the modem you should add something like
post-up ip addr add 192.168.100.2/31 dev extern0   true
to the configuration of the interface which is connected to the cable modem. Make sure you're not using the same network internally - or find a proper way to handle it. If you access http://192.168.100.1/ then, you'll be able to retrieve some basic information form the modem. If you google a bit longer, you might even be able to do more stuff! But to monitor the power levels and signal-to-noise ratio, this is all we need. I'm using Munin usually, as the web interface is just much easier to setup than the collectd CGI (hint, hint!!). Drop the following two scripts into the Munin plugins folder. wget, sed and grep is all they need, so it should be easy to get them working. cablemodem signalnoise.sh
#!/bin/sh
# Copyright (c) 2010 Bernd Zeimetz <bzed@debian.org>
#
# Permission to use, copy, modify, and/or distribute this software for any
# purpose with or without fee is hereby granted, provided that the above
# copyright notice and this permission notice appear in all copies.
#
# THE SOFTWARE IS PROVIDED "AS IS" AND THE AUTHOR DISCLAIMS ALL WARRANTIES
# WITH REGARD TO THIS SOFTWARE INCLUDING ALL IMPLIED WARRANTIES OF
# MERCHANTABILITY AND FITNESS. IN NO EVENT SHALL THE AUTHOR BE LIABLE FOR
# ANY SPECIAL, DIRECT, INDIRECT, OR CONSEQUENTIAL DAMAGES OR ANY DAMAGES
# WHATSOEVER RESULTING FROM LOSS OF USE, DATA OR PROFITS, WHETHER IN AN
# ACTION OF CONTRACT, NEGLIGENCE OR OTHER TORTIOUS ACTION, ARISING OUT OF
# OR IN CONNECTION WITH THE USE OR PERFORMANCE OF THIS SOFTWARE.
PATH=/bin:/sbin:/usr/bin:/usr/sbin
export PATH
if [ "$1" = "config" ]; then
        echo graph_title cable modem signal to noise ratio
        echo 'graph_args --base 1000'
        echo 'graph_vlabel dB'
        echo 'graph_category network'
        echo 'graph_info This graph shows the signal to noise ratio of the Scientific-Atlanta cable modem.'
        echo "signalnoise.label ratio"
        echo "signalnoise.info Signal to noise ratio"
        echo 'signalnoise.draw LINE2'
        echo 'signalnoise.type GAUGE'
        exit 0
fi
wget -q -O - http://192.168.100.1/system.asp  \
     grep 'Signal to Noise'   \
     sed 's,.* ,signalnoise.value ,;s, dB.*,,'
cablemodem powerlevel.sh
#!/bin/sh
# Copyright (c) 2010 Bernd Zeimetz <bzed@debian.org>
#
# Permission to use, copy, modify, and/or distribute this software for any
# purpose with or without fee is hereby granted, provided that the above
# copyright notice and this permission notice appear in all copies.
#
# THE SOFTWARE IS PROVIDED "AS IS" AND THE AUTHOR DISCLAIMS ALL WARRANTIES
# WITH REGARD TO THIS SOFTWARE INCLUDING ALL IMPLIED WARRANTIES OF
# MERCHANTABILITY AND FITNESS. IN NO EVENT SHALL THE AUTHOR BE LIABLE FOR
# ANY SPECIAL, DIRECT, INDIRECT, OR CONSEQUENTIAL DAMAGES OR ANY DAMAGES
# WHATSOEVER RESULTING FROM LOSS OF USE, DATA OR PROFITS, WHETHER IN AN
# ACTION OF CONTRACT, NEGLIGENCE OR OTHER TORTIOUS ACTION, ARISING OUT OF
# OR IN CONNECTION WITH THE USE OR PERFORMANCE OF THIS SOFTWARE
PATH=/bin:/sbin:/usr/bin:/usr/sbin
export PATH
if [ "$1" = "config" ]; then
        echo graph_title cable modem power level
        echo 'graph_args --base 1000'
        echo 'graph_vlabel dBmV'
        echo 'graph_category network'
        echo 'graph_info This graph shows receive and transmit power levels of the Scientific-Atlanta cable modem.'
        echo "receive.label receive"
        echo "receive.info Receive power level"
        echo 'receive.draw LINE2'
        echo 'receive.type GAUGE'
        echo "transmit.label transmit"
        echo "transmit.info Transmit power level"
        echo "transmit.draw LINE2"
        echo "transmit.type GAUGE"
        exit 0
fi
wget -q -O - http://192.168.100.1/system.asp   grep dBmV   \
    sed -e 's,.* ,,;s, dBmV.*,,' \
        -e '1s/^/receive.value /' \
        -e '2s/^/transmit.value /'
Munin plugin cablemodem powerlevel Munin plugin cablemodem signal noise ratio 
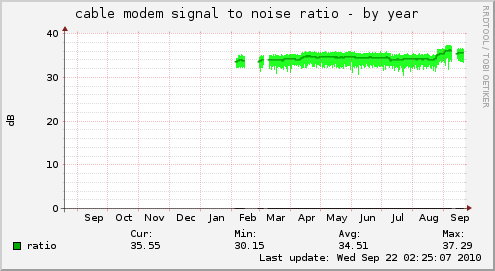
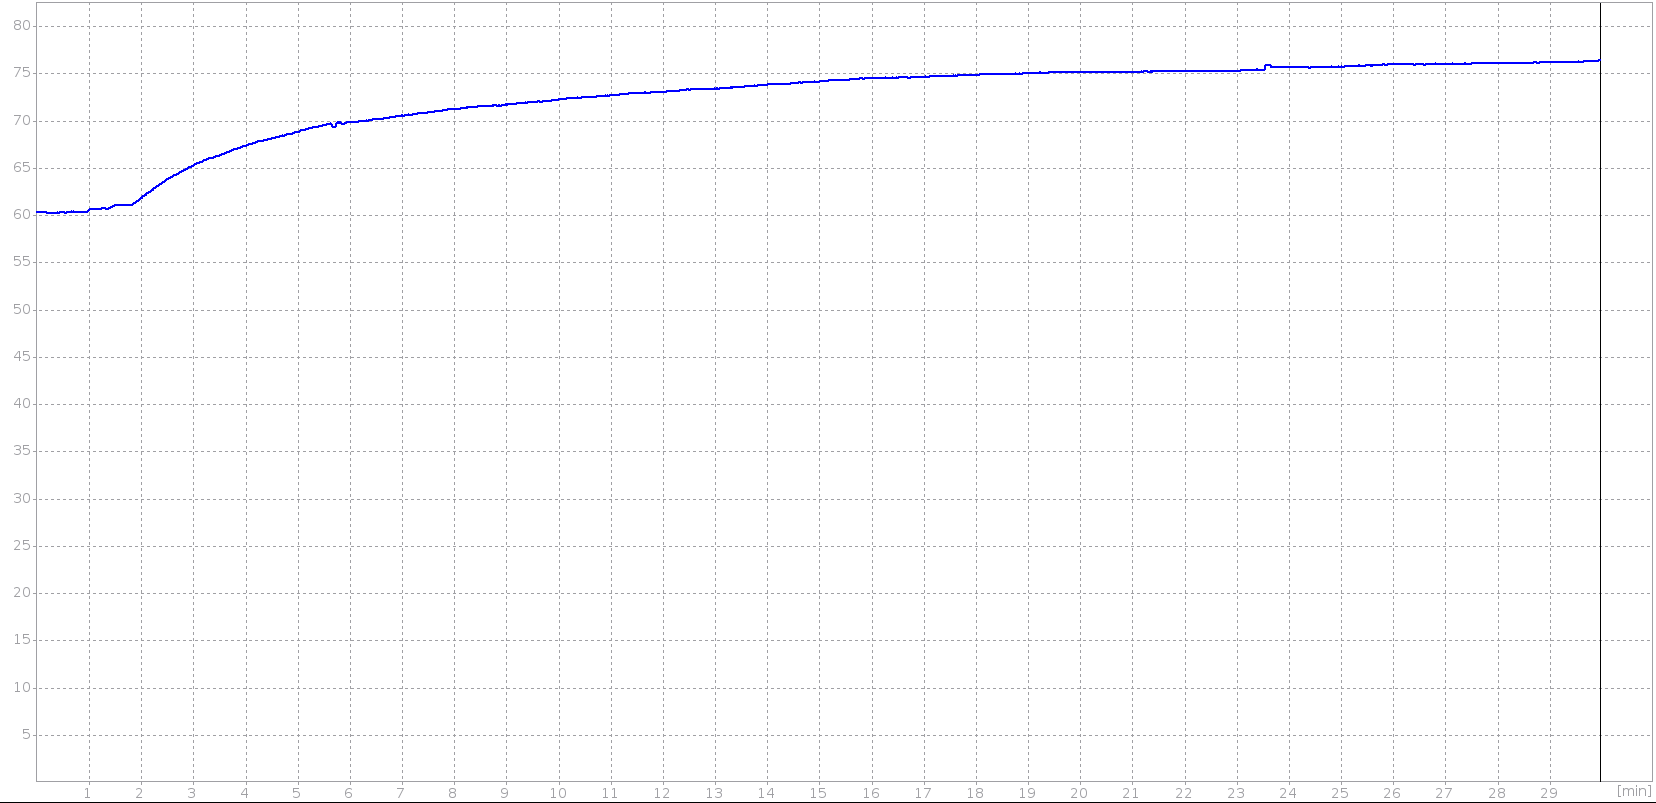
Guess you can easily figure out when I had issues with my cable connection.

22 September 2010

Bernd Zeimetz: refactoring the guruplug server plus - part two

Although the modifications described in my last blog post about refactoring the GuruPlug resulted in a well working GuruPlug, I've decided to give it some more air to breath at the top of the case. The large round piece of plastic in the middle asked to be removed - and now a shiny 60mm fan grill protects the board from the bad world outside of the case. GuruPlug Server Plus case with fan grill (1/2) GuruPlug Server Plus case with fan grill (2/2) So far its working fine and not too hot. Guess I'll see what happens next summer.

10 September 2010

Bernd Zeimetz: refactoring the guruplug server plus

As mentioned in my last blog post the GuruPlug Server Plus needs some major refactoring before it can be used. Not doing so will make you end up with a fried brick. There are various stories in the forums about cooling it properly, so you might want to have a look first instead of following mine blindly. And of course - whatever you do - it is your fault when you end up with a brick, not mine!.

Replacing the power supply As I would never ever trust the PSU (see my last blog post for the gory details) and some additional free space in the case is necessary, it is time to rip it out. As replacement I've ordered an external 5V/20W PSU. To connect it to the plug I've drilled a hole into the case and added a proper connector after soldering the original cable from the old PSU to it. Make sure to add some retainer to stop the cable from touching the CPU/memory heat sinks later. GuruPlug Server Plus PSU replacement GuruPlug Server Plus PSU cabling

Proper heatsinks One of the biggest problems in the original GuruPlug design is the heat spreading and collecting piece of alloy, which probably makes things even worse than better. After some discussion in #debian-devel the idea came up, that the board should be able to run fine without a heatsink - at least when idling. That is the case, indeed. So let's get rid of that piece of alloy, together with the holders and springs. Unfortunately heat things are necessary to handle some work load. To mount them make sure you get some good thermal glue as you don't want to insulate the chips from their heat sinks. I've used Arctic Silver II thermal glue - not cheap, but working well. Make sure to clean the heat sinks and chips properly with alcohol (2-Propanol is my favourite for that), so there is no fat and dust left. When you use the glue be careful to read the documentation properly and make sure you apply only as much as necessary - a thin coating is enough. After applying the glue and mounting the heat sink you need a clamp to put some pressure on it while the glue dries.

Heat sinks for the memory As there is a lot of space around the memory chips, I've got some 14x14x6mm heat sinks. Luckily there are only small parts on the other side of the board, so it was not hard to attach clamps to ensure the glue is able to dry properly. In case largish amounts of glue are squeezing out between heat sink and chip you probably want to start from scratch and clean everything (quickly!) with alcohol again. GuruPlug Server Plus memory heat sink clamping

Gigabit Ethernet PHY and CPU heatsinks PHY and CPU need proper heatsinks as they're becoming pretty hot under load. Due to space limitations I had to stick with a 17x17x20mm heat sink for the PHY. I've tried to get a largish heat sink with BGA mount for the CPU, but I was not able to find one in short time and without ordering 1000 of them. So I've got another one of the 17x17x20mm model for the CPU. Later I found two other heat sinks which might fit on the GuruPlug's CPU: Malico 19x19x25mm or a Advanced Thermal Solutions Maxigrip. But for now the smaller one will have to do the job, also I'm scared to removed it without destroying the CPU. To mount the heat sink on the PHY a bit of preparation is necessary to ensure that the glue doesn't result in short cuts on the IC's pins. The arctic silver documentation recommends to use silicone on the pins to stop the glue. As I neither had the proper silicone nor did I want to make such a mess, I've decided to get a sticky insulating tape and some tooth picks to mount it properly on the IC pins. Make sure to do a proper job here! With good clamps you can work on the PHY while the memory heat sink glue is still drying. GuruPlug Server Plus - preparing the PHY The other problem on this side of the board is that some higher parts are mounted on the lower side of the board, so make sure to get some foam to protect them from your clamps. Except of the size of the heat sinks there is no real difference to the small ones: add glue, mount the heat sink and fix it with a clamp. GuruPlug Server Plus - mounting the PHY heatsink Before the glue dries completely make sure you remove the duct tape strips again. Be careful not to wipe any excess glue onto the IC pins. If you manage to do so you might want to remove and clean everything properly. So just be careful and everything should be fine. GuruPlug Server Plus - mounting the PHY heatsink 3 Mounting the heat sink on the CPU is easier as the CPU is a nice BGA package. No need to protect pins an there are none. GuruPlug Server Plus - mounting the CPU heatsink

Finished As you're able to see on the photo I did not the very perfect job, but fine enough to work properly. GuruPlug Server Plus - heatsinks

First tests with the new heatsinks Some tests with stress and some heavy network traffic showed quickly that the heat sinks are working well! But not well enough to be able to mount them into the original closed case (how the hell was this supposed to work before!?). Without any air to breath the temperature on the CPU heat sink went up to 85 deg C quickly. So on the CPU's die are > 100 deg C, which is at least close to the max allowed temperature. GuruPlug Server Plus - still too hot

Adding air holes Obviously some additional air holes are necessary. After meeting my drill and cutter, the original case looks a bit like a piece of cheese now. GuruPlug Server Plus - case with air holes 1 GuruPlug Server Plus - case with air holes 2 Some more tests show that the temperature sticks around 76 deg C under heavy load now. That is still pretty hot, especially when the temperature in the room becomes hotter in summer. As I'm not going to run a lot of traffic trough it (my cable connection is limited to 20 MBit/s anyway), I guess it will work. Below is a graph I've recorded with my multimeter and qtdmm. It shows that the temperature rises to ~76 deg C and stays there. GuruPlug Server Plus - temperature curve Not sure if I could introuce some more load, the CPU had a load of 6 running stress. Network traffic was around 2x100MBit/s again. I could imagine with 2xGBit the CPU and PHY would become much hotter (no idea if it would be able to handle it at all, though). The PHY was usually a bit cooler than the CPU, so I didn't spend time to measure the temperature properly.

Conclusion My opinion is still the the original design of the plug is an insane QA and design failure. There is no way that it could ever work as shipped originally. If I'd have to design a new case for it, it should have a single insulated compartment for a PSU to ensure that no contact with high voltage is possible. The case around all other parts should be made of alloy with a lot of air holes. So the case could be used as heat sink (properly done, not with these insulating duct tape strips) and at the same time allow air circulation and a nice view on the LEDs on the board. Of course the case would be much more expensive than, but I'm sure it would work properly and would be worth the money. And if done peoperly, it would look much better than this blinking plastic thing. I could imagine it would sell well! So at the end I'm wondering what GlobalScale Technologies will do. I doubt it will be possible to create the 'professional upgrade kit' as they had announced before. Replacing all units is the only proper way. We'll see what happens. At least my GuruPlug is working well now and it will be used as replacement for my OpenWRT router soon. WiFi is not working, but that will be handled by my media center anyway. GuruPlug Server Plus - running plug

29 August 2010

Luca Bruno: Too many gurus spoil the plug

Being a rather patient and peaceful guy, I acknowledge that perfection is a difficult goal and I rarely rant publicly about troubles I ve stumbled upon.
Today however, I feel I have to wholeheartedly agree with Bernd about Guruplug: it has been a waste of money. I received mine in May, with the order placed and payed in February. First thing noticed is the issue with the power supply: I really think they forgot QA testing on these machines, as my PSU (and many others, just skim through the official forum) blew up just an hour after power-up. I wasn t lucky enough to admire over-heating and internal (mis-)cooling, as it went immediately through GlobalScale sales department for a RMA under warranty. And then I waited for GlobalScale, for an actually working unit. And still I am, it s almost September now. Patiently waiting (hoping, I d say) for some answers. I m not sure who to blame here, Marvell, GlobalScale or both, for this issues with regards to QA, design and sales. But I m quite sure the final result has been already perfectly described: a major fail.

Bernd Zeimetz: the guruplug server plus - major design and qa fail

As a lot of people are coming to my blog to read the installing instructions for Debian on the GuruPlug Server Plus, I shall not hide my opinion about it: It is a major design and QA fail. Don't waste your money on it.

The power supply Although I've ordered the Guruplug pretty early with the promise, that I'd have it in April, it arrived at the end of May due to QA issues with the power supply. While I appreciate that they didn't deliver broken power supplies, I would have preferred not to receive one which was "fixed" by somebody who uses the soldering iron like an axe. Here are some macro photos to show the gory details: GuruPlug Server Plus PSU 1 GuruPlug Server Plus PSU 2 GuruPlug Server Plus PSU 3

Software issues The version of UBoot which shipped with the device was only able to boot from NAND and network. Booting from USB failed and ext2 support was missing, too. Didn't have a look if the community came up with a fixed UBoot version yet, but in my opinion a piece of hardware for >100 EUR should not have such flaws.

Thermal issues Using the Guruplug with more than one 100 MBit/s connection is just not possible, as it would toast itself to death. For the details have a look at this discussion in the NewIT forum, it links to a lot of interesting photos and postings. This issue is a major design and QA failure. Even without knowing what the datasheets say, it is easy to imagine that a thin piece of alloy is not the proper way to cool a CPU and network chip. Especially not when it is mounted with cheapish pads instead of a proper paste. GuruPlug Server Plus Cooling 1 As it seems the plan was to send the heat to the shielding of the network/USB/eSata ports (the area is marked red as my first plan was to remove that part of the alloy and reuse the heat-spreader), a strong indication for that is that this is the only area with holes for air circulation. I could imagine that it was not possible to have these holes next to the PSU, which was mounted above the heat-spreader, to avoid electrical shocks. GuruPlug Server Plus Cooling 2 As there was no other opening for the heat to leave the case, even the microSD card became pretty hot - I've measured temperatures around 60 deg. C next to the card - while CPU and 100MB/s network were idling. The official information from GlobalScale Technologies is that only 10/100MBit/s should be used as workaround to avoid overheating until a "Professional Upgrade Kit" is released. As mentioned here the upgrade kit announcement was removed silently from GST's website. To be honest, this doesn't make me wonder. There is no way to fix the Guruplug with an external fan or any other external magic as the only way to fix it is to cool the CPU and networking chip properly. There are various workarounds for the cooling issues posted to the forums. I've decided to rip out the power supply and heat spreader out of the case and get a nice external PSU. The new connector is mounted, ready to supply the GuruPlug's board with power. GuruPlug Server Plus power connector Currently I'm waiting for the new heat sinks and glue to arrive. Then I'll give it a try to mount eveything in the small case again, probably with some additional air holes. As soon as I have a workign solution, I'll blog about it again.

Bernd Zeimetz: the guruplug server plug - major design and qa fail

As a lot of people are coming to my blog to read the installing instructions for Debian on the GuruPlug Server Plus, I shall not hide my opinion about the Guruplug Server Plus: It is a major design and QA fail. Don't waste your money on it.

The power supply Although I've ordered the Guruplug pretty early with the promise, that I'd have it in April, it arrived at the end of March due to QA issues with the power supply. While I appreciate that they didn't deliver broken power supplies, I would have preferred not to receive one which was "fixed" by somebody who uses the soldering iron like an axe. Here are some macro photos to show the gory details: GuruPlug Server Plus PSU 1 GuruPlug Server Plus PSU 2 GuruPlug Server Plus PSU 3

Software issues The version of UBoot which shipped with the device was only able to boot from NAND and network. Booting from USB failed and ext2 support was missing, too. Didn't have a look if the community came up with a fixed UBoot version yet, but in my opinion a piece of hardware for >100 EUR should not have such flaws.

Thermal issues Using the Guruplug with more than one 100 MBit/s connection is just not possible, as it would toast itself to death. For the details have a look at this discussion in the NewIT forum, it links to a lot of interesting photos and postings. This issue is a major design and QA failure. Even without knowing what the datasheets say, it is easy to imagine that a thin piece of alloy is not the proper way to cool a CPU and network chip. Especially not when it is mounted with cheapish pads instead of a proper paste. GuruPlug Server Plus Cooling 1 As it seems the plan was to send the heat to the shielding of the network/USB/eSata ports (the area is marked red as my first plan was to remove that part of the alloy and reuse the heat-spreader), a strong indication for that is that this is the only area with holes for air circulation. I could imagine that it was not possible to have these holes next to the PSU, which was mounted above the heat-spreader, to avoid electrical shocks. GuruPlug Server Plus Cooling 2 As there was no other opening for the heat to leave the case, even the microSD card became pretty hot - I've measured temperatures around 60 deg. C next to the card - while CPU and 100MB/s network were idling. The official information from GlobalScale Technologies is that only 10/100MBit/s should be used as workaround to avoid overheating until a "Professional Upgrade Kit" is released. As mentioned here the upgrade kit announcement was removed silently from GST's website. To be honest, this doesn't make me wonder. There is no way to fix the Guruplug with an external fan or any other external magic as the only way to fix it is to cool the CPU and networking chip properly. There are various workarounds for the cooling issues posted to the forums. I've decided to rip out the power supply and heat spreader out of the case and get a nice external PSU. The new connector is mounted, ready to supply the GuruPlug's board with power. GuruPlug Server Plus power connector Currently I'm waiting for the new heat sinks and glue to arrive. Then I'll give it a try to mount eveything in the small case again, probably with some additional air holes. As soon as I have a workign solution, I'll blog about it again.

4 July 2010

Bernd Zeimetz: gimp-plugin-registry 3.5-1

During the last three months and since my last blog-post about gimp-plugin-registry a lot happened: Mainly a large number of new plugins was added, but also various enhancements and bugfixes went into the package, together with updates for various already included plugins. The GIMP screenshot with open FX-Foundry menu For those who don't know gimp-plugin-registry yet, it is a collection of scripts and plugins for The GIMP. The name is based on the webpage GIMP Plugin Registry, where most (new) plugins and scripts are listed. So far the package ships with 170 scripts/plugins. Most of the scripts are written in TinyScheme, but there are also several plugins in C or Python. Probably most noticeable is the inclusion of the GIMP FX Foundry, which is an awesome collection of 124 scripts. Below follows a list of all scripts and plugins as shown in the long description of the Debian package. New plugins are marked with a bold fontface. If there is any interest from other distributions to include the package, I'd be happy to help out to make an integration as easy as possible. The few interesting parts could be ripped out of debian/rules and shipped as a normal Makefile, so they could be used easily. More complicated is the generation of the package description and copyright information, but I guess instead of writing debian/coyright and debian/control, it should be possible to integrate the information into a rpm spec file template or similar files. So in case you're interested to port the package to Fedora, OpenSuSE or some other distribution, don't hesitate to contact me! The sources are available via git, see git.recluse.de for details. For wishes, suggestions and bug reports either use the Debian BTS or Launchpad. While I prefer bugs via the BTS, it might be easier for non-Debian users to file bugs in the Ubuntu Launchpad.

23 June 2010

Bernd Zeimetz: creating a google sitemap for ikiwiki

ikiwiki is not yet able to create a Google sitemap internally, so I'm using google-sitemapgen. To run it automatically when the website is being updated, I've changed the git hook to run it after the ikiwiki hook. /path/to/myikiwiki.git/hooks/post-update
#!/bin/sh
/path/to/myikiwiki.git/hooks/post-update.ikiwiki
/usr/bin/google-sitemapgen --config=/path/to/mywikiconfig/sitemap_config.xml
exec git-update-server-info
/path/to/mywikiconfig/sitemap_config.xml
<?xml version="1.0" encoding="UTF-8"?>
<site
  base_url="http://bzed.de/"
  store_into="/path/to/bzed.de/sitemap.xml.gz"
  verbose="0"
  suppress_search_engine_notify="0"
  default_encoding="UTF-8"
  >
  <directory
    path="/path/to/bzed.de"
    url="http://bzed.de/"
    default_file="index.html"
  />
  <!-- Exclude URLs that end with a '~'   (IE: emacs backup files)      -->
  <filter  action="drop"  type="wildcard"  pattern="*~"           />
  <!-- Exclude URLs within UNIX-style hidden files or directories       -->
  <filter  action="drop"  type="regexp"    pattern="/\.*"     />
  <!-- Exclude ikiwiki directories -->
  <filter  action="drop"  type="regexp"  pattern="/helponformatting/*"           />
  <filter  action="drop"  type="regexp"  pattern="/ikiwiki/*"                    />
  <filter  action="drop"  type="regexp"  pattern="/markdown/*"                   />
  <filter  action="drop"  type="regexp"  pattern="/openid/*"                     />
  <filter  action="drop"  type="regexp"  pattern="/pagespec/*"                   />
  <filter  action="drop"  type="regexp"  pattern="/preprocessordirective/*"      />
  <filter  action="drop"  type="regexp"  pattern="/sandbox/*"                    />
  <filter  action="drop"  type="regexp"  pattern="/shortcuts/*"                  />
  <filter  action="drop"  type="regexp"  pattern="/smileys/*"                    />
  <filter  action="drop"  type="regexp"  pattern="/subpage/*"                    />
  <filter  action="drop"  type="regexp"  pattern="/templates/*"                  />
  <filter  action="drop"  type="regexp"  pattern="/theme/*"                      />
  <filter  action="drop"  type="regexp"  pattern="/wikiicons/*"                  />
  <filter  action="drop"  type="regexp"  pattern="/wikilink/*"                   />
  <filter  action="drop"  type="regexp"  pattern="/wmd/*"                        />
  <!-- Exclude css files, favicon and javascript -->
  <filter  action="drop"  type="wildcard"    pattern="*.css"                         />
  <filter  action="drop"  type="wildcard"    pattern="*favicon.ico"                  />
  <filter  action="drop"  type="wildcard"    pattern="*.js"                          />
  <!-- Exclude ikiwiki.cgi -->
  <filter  action="drop"  type="wildcard"    pattern="ikiwiki.cgi"                   />
</site>
See the examples and README files in /usr/share/doc/google-sitemapgen/ for an introduction into configuring google-sitemapgen. So far the generated sitemaps works very well, especially for search engines which are not able to use the rss feeds like Google does.

13 June 2010

Bernd Zeimetz: signs of bad package maintenance

<rant>Recently I've adopted a package, mainly as Merkaartor uses it now. It made me sad to see in which bad condition the package was. Here are just a few things I had to do to bring it into shape: These points were only the larger issues, a lot more were fixed by me or by QA uploads while the package was orphaned. For me it seems that the former maintainer of that package threw some stuff together just to be able to upload the package - or at least run out of spare time to maintain a package properly several years ago. To all the people who maintain packages - and it doesn't matter if you maintain a single package or hundreds of them: Please orphan or at least RFA your packages if you don't have the proper time to maintain (all of) them. Don't open new ITPs if you obviously don't have the time to maintain the packages you have already. Talk with your upstreams, they're usually happy about it. Look at Lintian warnings and errors instead of overriding them. If you take patches from NMUs, say 'thanks' to the poor soul who had to create them for you in debian/changelog instead of taking the work without any notice. Remember - Debian is a community effort, not a run for the highest number of maintained packages on your QA page.</rant>

12 June 2010

Bernd Zeimetz: styling changes in ikiwiki 3.20100610

Some minutes before the release of 3.20100610 we convinced Joey in #ikiwiki to commit the following changes: We hope that nobody wants to hit us with a bat now :-)

11 June 2010

Bernd Zeimetz: merkaartor 0.16.0 available in unstable

Merkaartor 0.16.0 was uploaded to Debian/unstable several days ago and should be available on all architectures now. Merkaartor As usual please help testing the new version - upstream and me will try to fix all bugs as fast as possible. Below follows the long list of new features, for the full list of changes see the CHANGELOG.

29 May 2010

Bernd Zeimetz: installing debian on the guruplug server plus

Yesterday finally my GuruPlug Server Plus arrived. Took longer than expected, but as it seems Globalscale had some issues with the power supplies and they were replaced before shipping the GuruPlugs. GuruPlug Server Plus and JTAG Board

The GuruPlug Basically the GuruPlugs are an enhanced version of the well known SheevaPlugs, the biggest difference is probably the need for an external JTAG/UART<>RS232 board to access the serial console. Good thing is that the board comes with a normal JTAG connector and an additional RS232 connector and 2.5V DC power outlet, so it will be useful for other devices, too. Globalscale could have chosen different connectors with less wiggly cables, though. As I was not able to find a useful howto about installing Debian on the Guruplug, I've written down what I did to install Debian unstable on a micro SD card using the Debian installer for the GuruPlug. I did not have a look who modified the Debian installer to work on the plug, but thanks for that! The instructions below are based on Martin Michlmayer's awesome SheevaPlug documentation, the hints from oinkzwurgl.org/guruplug and various forum posts in the plugforum.

Preparations Please note that I'm not resposible for whatever you're doing with your plug. If you follow this tutorial and end up with a brick, it is your fault, not mine. To install the GuruPlug you need the JTAG Board. Connect the UART port to the GuruPlug and the JTAG board to your computer, it should show up as FTDI (thanks for using good chips!) USB<>Serial converter. Serial port settings are 115200, 8-N-1, no hw/sw flow control. The other thing you should prepare is a working tftpd, I'm using aftpd.
apt-get install aftpd
Recent versions share files from /srv/tftp/, in case you're running Lenny /var/lib/tftpboot/ should be the place to drop your files. When everything is connected properly the boot process should show up in minicom, make sure to press some key to enter uBoot. The first thing you should do is to save the original uBoot environment in case you want to restore the factory settings later. Run
printenv
and save the output somewhere.

Upgrading uBoot Unfortunately the uBoot version on the GuruPlug is pretty old and seems to have some issues in booting from USB devices, so the first thing you should do is to upgrade it. You might want to investigate if there is even a better, more recent uBoot version available somewhere, or build one on your own, but I didn't bother and took the uBoot.guruplug.bin from here. The main issue with that is that booting from USB still seems to be buggy (even for FAT partitions) and that ext2load is still not supported. Otherwise it works well :-). I'm mainly following Martin Michlmayer's tutorial again. Download the uBoot.guruplug.bin and drop it into the tftpd directory. Make sure you always set the plug's IP address (ipaddr) and your server's IP address (serverip) properly. I'll use 192.168.121.253 for the plug and 192.168.121.2 for the server in all examples, make sure to change that for your own needs. Stop if something goes wrong, especially when the tftp download failed.
setenv ipaddr 192.168.121.253
setenv serverip 192.168.121.2
tftp 0x6400000 uBoot.guruplug.bin
nand erase 0x00000000 0x0100000
nand write 0x6400000 0x0000000 0x80000
reset
Enter uBoot again after the reset.

Preparing the installer Download uImage and uInitrd to your tftpd directory. Although I've heard that setting mainlineLinux/arcNumber in the uBoot environment is not necessary anymore for very recent kernel, lets set them to make sure the Debian kernel works:
setenv mainlineLinux yes
setenv arcNumber 2097
saveenv
reset
Again, enter uBoot after the reset.

Running the installer Run the following in the uBoot console:
setenv ipaddr 192.168.121.253
setenv serverip 192.168.121.2
tftpboot 0x01100000 uInitrd
tftpboot 0x00800000 uImage
setenv bootargs console=ttyS0,115200n8 base-installer/initramfs-tools/driver-policy=most
bootm 0x00800000 0x01100000
You should see the installer starting now. You might want to follow the following hints:
  • Before configuring the network, go back and set the debconf priority to low, Then continue. While chosing the Debian mirror, chose sid as the Debian version to install. If you don't have sid as choice, use a different mirror. The kernel in testing does not boot on the GuruPlug, you need 2.6.32-13 from sid.
  • You might want to load the 'network console' installer component and continue via ssh. Makes things fater and colourful.
  • Suggested partitioning: I've installed Debian to an 8GB micro SDcard. The SDcard reader is connected via USB and shows up as /dev/sdb (/dev/sda should be the internal NAND and not shown by the installer). I've used 150MB ext2 for /boot and the rest of the space for /, using ext4. You might want to use the noatime option on both filesystems to avoid unnecessary write access to the SDcard. You might choose to add a swap partition, but SDcards are so slow, so I've skipped that.
When you continue the installation, you will hit the following problem:
  • The installer might fail on 'Make the system bootable' (not sure if it does for you, it did so with the kernel from testing).
  • The uBoot is not able to boot from your /boot anyway. USB support is buggy and ext2load missing.
We'll work around these issues by writing the kernel and initrd into the plug's NAND. To do so, enter a shell in the installer and chroot into the install target. We'll then create the necessary uImage.bin and uInitrd and scp them to our tftpd directory:
chroot /target /bin/bash
cd /boot
mkimage -n vmlinuz -A arm -O linux -T kernel -C none -a 0x00008000 -e 0x00008000 -d /boot/vmlinuz uImage.bin
mkimage -n 'vmlinuz initrd' -A arm -O linux -T ramdisk -C gzip -d /boot/initrd.img uInitrd
scp uI* root@192.168.121.2:/srv/tftp
Now leave the shell, finish the installation and reboot, enter uBoot again.

Make the plug bootable To write kernel and initrd to the NAND memory, we have to transfer it via tftp first, then erase the NAND area we want to write to and then write it to the NAND. The values I've chosen here should be fine for the current Debian kernel, but you might need to change the necessary size for the initrd. To do so have a look at the output while transferring the initrd - the transferred bytes are displayed. They have to fit into the amount of bytes you write (the last option to nand write.e).
setenv ipaddr 192.168.121.253
setenv serverip 192.168.121.2
tftp 0x6400000 uImage.bin
nand erase 0x100000 0x400000
nand write.e 0x6400000 0x100000 0x400000
tftp 0x6400000 uInitrd
nand erase 0x500000 0x1fb00000
nand write.e 0x6400000 0x500000 0x600000
Now we need to set the necessary boot options. Make sure to change the root device if you've chosen a different layout from that I've suggested above, or if you're not using a SDcard.
setenv bootargs_debian 'console=ttyS0,115200 root=/dev/sdb2'
setenv bootcmd_nand 'nand start; nand read.e 0x00800000 0x100000 0x400000; nand read.e 0x01100000 0x500000 0x600000'
setenv bootcmd 'setenv bootargs $(bootargs_debian); run bootcmd_nand; bootm 0x00800000 0x01100000'
saveenv
run bootcmd

Finish Your GuruPlug should boot your new Debian installation now. Have fun! I'll try to keep the howto updated for changes in uBoot and the installer, but I might not have the time to so quickly. Patches and comments are welcome!.
root@guruplug:~# uname -a
Linux guruplug 2.6.32-5-kirkwood #1 Fri May 21 05:44:29 UTC 2010 armv5tel GNU/Linux
root@guruplug:~# cat /proc/cpuinfo 
Processor   : Feroceon 88FR131 rev 1 (v5l)
BogoMIPS    : 1192.75
Features    : swp half thumb fastmult edsp 
CPU implementer : 0x56
CPU architecture: 5TE
CPU variant : 0x2
CPU part    : 0x131
CPU revision    : 1
Hardware    : Marvell GuruPlug Reference Board
Revision    : 0000
Serial      : 0000000000000000
root@guruplug:~# 

20 May 2010

Bernd Zeimetz: merkaartor - countdown to 0.16

As announced on the Merkaartor mailing lists, version 0.16 is planned to be released on 6th June. Therefore I've uploaded a git snapshot to experimental today. Please give it a try and report all problems, either to the Debian BTS or directly in the upstream bug tracker. Merkaartor 0.16 screenshot Version 0.16 will contain a lot of new features and various bugfixes and enhancements. For me the most important additions are support for Walking Papers and support for OpenStreetBugs. Also Merkaartor uses libgps now, so it is able to connect to recent versions of gpsd. With thanks to Chris Browet, the upstream author of Merkaartor, the next version of gpsd will ship with libQgpsmm, a C++/QT library to connect to gpsd. It should be possible to compile libQgpsmm under most platforms which are supported by QT4, including windows. Merkaartor will use libQgpsmm when available, so even Windows users will be able to use a remote gpsd instance.

19 May 2010

Bernd Zeimetz: new css for bzed.de

After more than a year of using ikiwiki to run bzed.de I thought it would be a good time replace the darkish-brown style by something bright. Also I wanted to get righ of the massive changes I had to do on the template files to make the old layout work. Unfortunately I hit one of the - in my opinion - major problems in the ikiwiki templates again: You can't rely on all <div>s being available on all pages, which is quite annoying when you need them to style the page with CSS. So I had to make a tiny change to page.tmpl:
diff --git a/templates/page.tmpl b/templates/page.tmpl
index 8a9911f..dbf78a0 100644
--- a/templates/page.tmpl
+++ b/templates/page.tmpl
@@ -111,8 +111,8 @@
 <TMPL_VAR CONTENT>
 <TMPL_IF HTML5></section><TMPL_ELSE></div></TMPL_IF>
-<TMPL_IF COMMENTS>
 <TMPL_IF HTML5><section id="comments"><TMPL_ELSE><div id="comments"></TMPL_IF>
+<TMPL_IF COMMENTS>
 <TMPL_VAR COMMENTS>
 <TMPL_IF ADDCOMMENTURL>
 <div class="addcomment">
@@ -121,8 +121,8 @@
 <TMPL_ELSE>
 <div class="addcomment">Comments on this page are closed.</div>
 </TMPL_IF>
-<TMPL_IF HTML5></section><TMPL_ELSE></div></TMPL_IF>
 </TMPL_IF>
+<TMPL_IF HTML5></section><TMPL_ELSE></div></TMPL_IF>
 <TMPL_IF HTML5><footer id="footer" class="pagefooter"><TMPL_ELSE><div id="footer" class="pagefooter"></TMPL_IF>
 <TMPL_IF HTML5><nav id="pageinfo"><TMPL_ELSE><div id="pageinfo"></TMPL_IF>
Everything else is a bit of CSS in local.css and some images. There are still various things which could be optimized, but there are more important things to do now :).

18 May 2010

Bernd Zeimetz: deb.li - the Debian ShortURL Service - status update

Although my progress in adding new features is not too fast (hint: patches and help is welcome), I'm quite happy with the progress of deb.li. As mentioned on my last post on debian-devel@l.d.o, I've spent some time to migrate it to the new, but very well written microframework Flask, which is based on Werkzeug, the probably most advanced WSGI utility module. The migration also allowed me to clean up several pieces of messy code which were necessary to work around some issues in python-bottle. Also I've started to bring the layout and CSS into a nice shape. The templates are finished already, just a bit CSS is missing now. Last but not least - the ciabot git script in the example clients is finished and used in a few git based projects on alioth.debian.org now. Just link /var/lib/gforge/chroot/home/users/bzed/godebian-client/ciabot.py to hooks/update and set your CIA project name by running git config hooks.cia-project your-project-name. As usual - comments, bugreports and patches are welcome!

Bernd Zeimetz: deb.li - the Debian ShortURL Service - beta test

After several other Debian developers convinced me that a ShortURL service, which is under control of a Debian Developer would be useful for them, I've spent some time to write the necessary code for it. And if it will be used regulary, I'll ask DSA if they want to host it on a proper machine. So I'm happy to announce the public beta test of deb.li (also available under go.debian.net)! Please note that neither the content of the pages nor the CSS is finished... :) As this should not become just another random, spammer-attracting ShortURL service, I will not provide a web based form to add new URLs. Instead new URLs have to be added via a simple JSON-RPC based interface. Other ways to add new URLs will be added on request (or by sending patches ;)), at least an email-gateway similar to db.debian.org is planned. The small piece of documentation which exists so far is available at wiki.debian.org/deb.li And if you want to give it a try now, log into alioth.debian.org and have a look into
/var/lib/gforge/chroot/home/users/bzed/godebian-client
- the usage is documented in the README file and should be pretty straight forward. I hope it will be useful - comments, bugreports and patches are welcome!

Bernd Zeimetz: gimp-plugin-registry package updated

Yesterday I finally found the time to update gimp-plugin-registry, the (hopefully!) largest and best collection of plugins for The GIMP. As usual here comes a short summary of the changes: Hope you like my work, suggestions and bug reports are welcome as usual!

15 April 2010

Bernd Zeimetz: gimp-plugin-registry package updated

Yesterday I finally found the time to update gimp-plugin-registry, the (hopefully!) largest and best collection of plugins for The GIMP. As usual here comes a short summary of the changes: Hope you like my work, suggestions and bug reports are welcome as usual!

7 April 2010

Debian News: Brief Updates: helping the release team, deb.li, linear algebra libraries and upcoming deadlines

3 April 2010

Bernd Zeimetz: deb.li - the Debian ShortURL Service - beta test

After several other Debian developers convinced me that a ShortURL service, which is under control of a Debian Developer would be useful for them, I've spent some time to write the necessary code for it. And if it will be used regulary, I'll ask DSA if they want to host it on a proper machine. So I'm happy to announce the public beta test of deb.li (also available under go.debian.net)! Please note that neither the content of the pages nor the CSS is finished... :) As this should not become just another random, spammer-attracting ShortURL service, I will not provide a web based form to add new URLs. Instead new URLs have to be added via a simple JSON-RPC based interface. Other ways to add new URLs will be added on request (or by sending patches ;)), at least an email-gateway similar to db.debian.org is planned. The small piece of documentation which exists so far is available at wiki.debian.org/deb.li And if you want to give it a try now, log into alioth.debian.org and have a look into
/var/lib/gforge/chroot/home/users/bzed/godebian-client
- the usage is documented in the README file and should be pretty straight forward. I hope it will be useful - comments, bugreports and patches are welcome!

Next.

Previous.